by David Sandel | Published on Mar 26, 2022 | WooCommerce
Rather than sharing passwords, which is a security and liability risk, adding a WooCommerce Collaborator with separate login information is always a better option. Whether we’re developing a new WooCommerce website, automating a sales and fulfillment process, or integrating a WooCommerce site with email marketing for e-commerce automations, Collaborator access is needed to view and download any current add-ons or extensions, and more often than not, to open support tickets on your behalf.
The process is simple and easy to follow so you’ll quickly get the hang of it. In fact, you should be able to add a WooCommerce collaborator in less than three minutes.
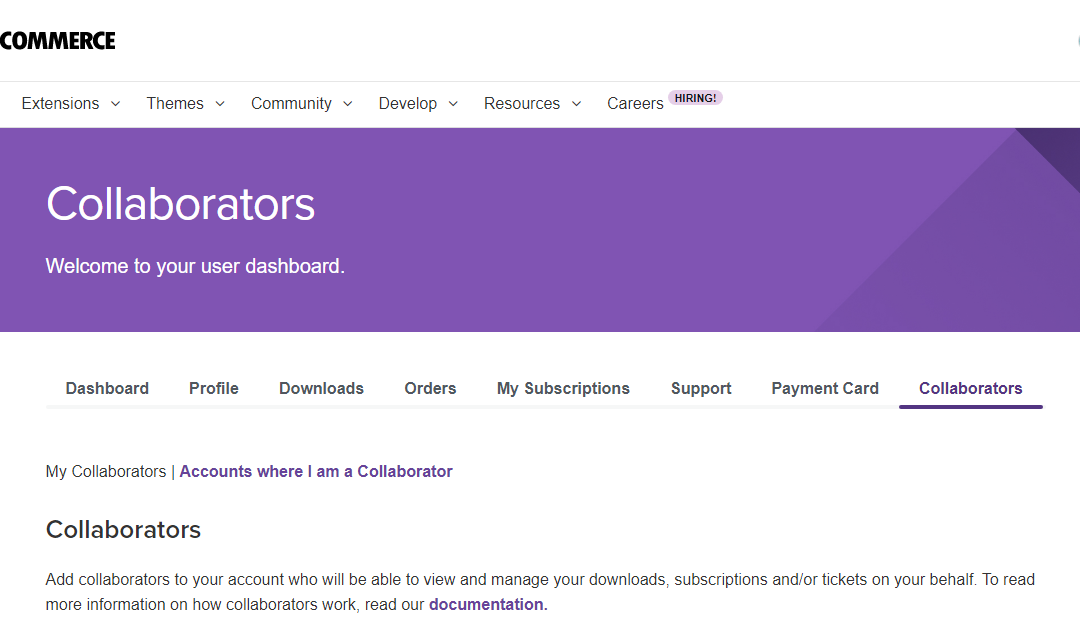
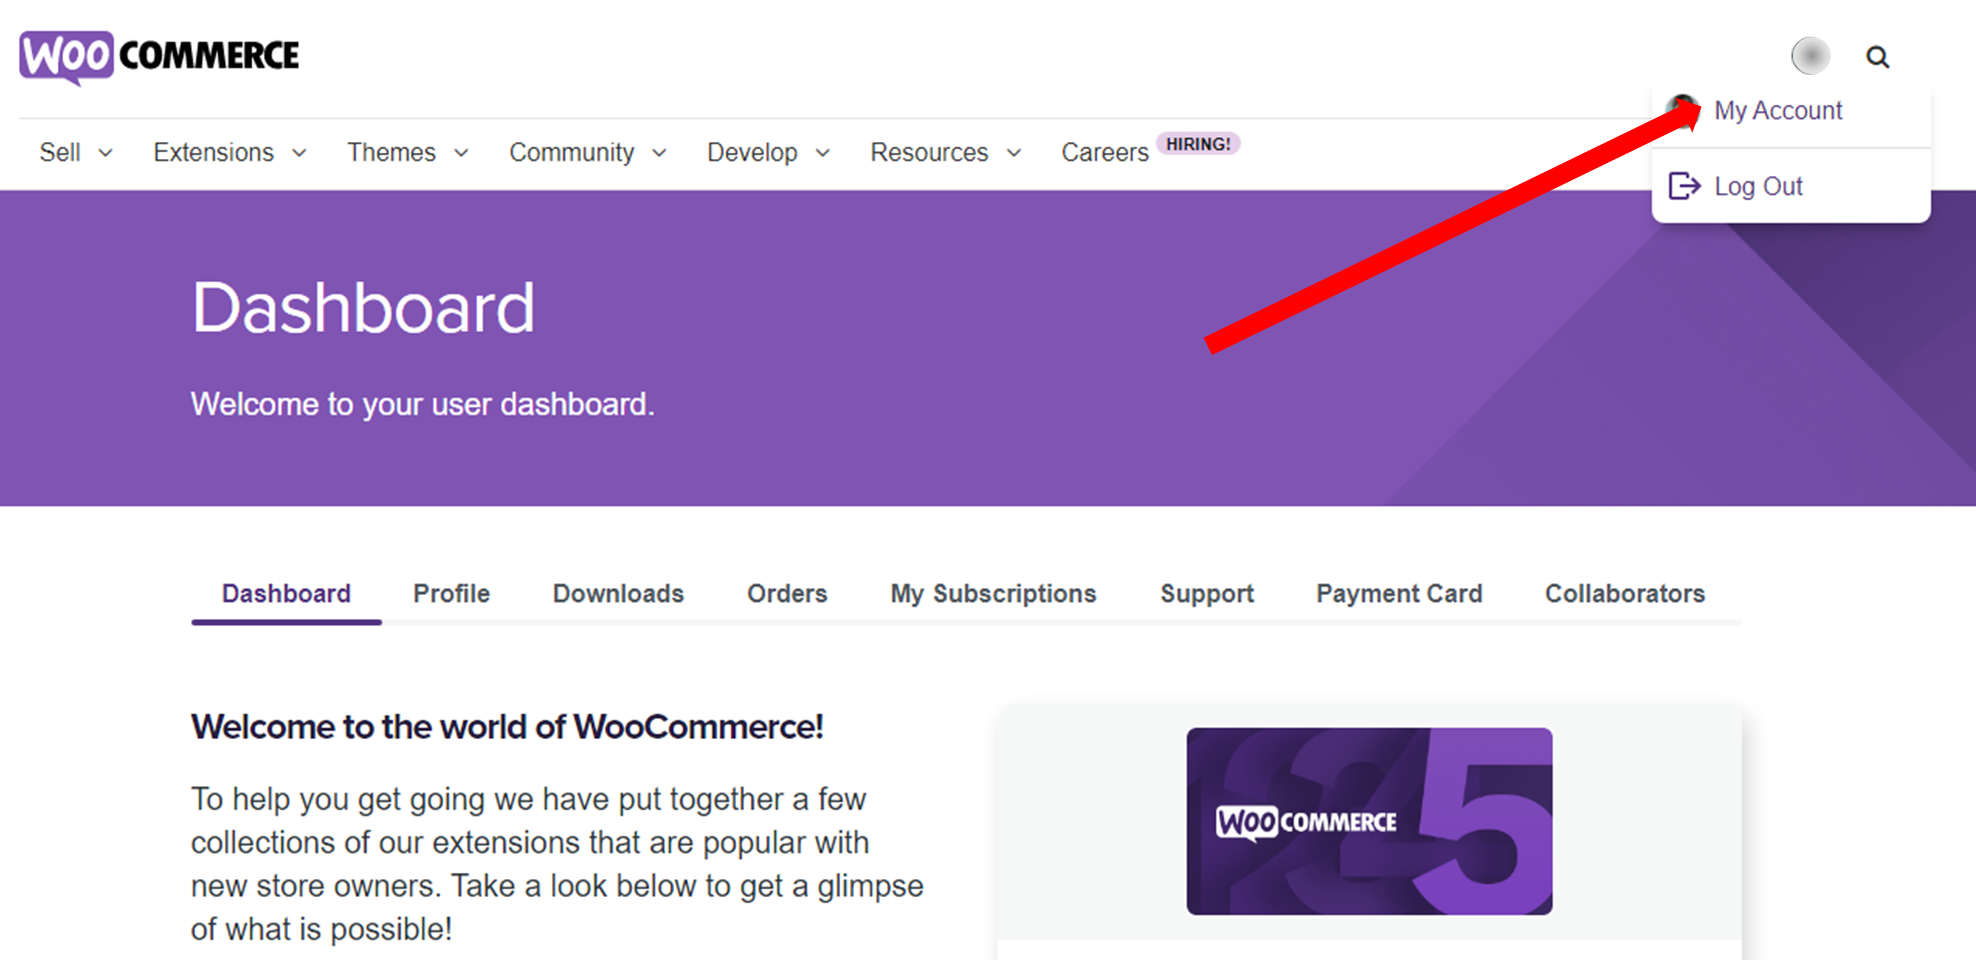
1. Login to your WooCommerce account and go to My Account
You will see different tabs but the default view is your user dashboard.
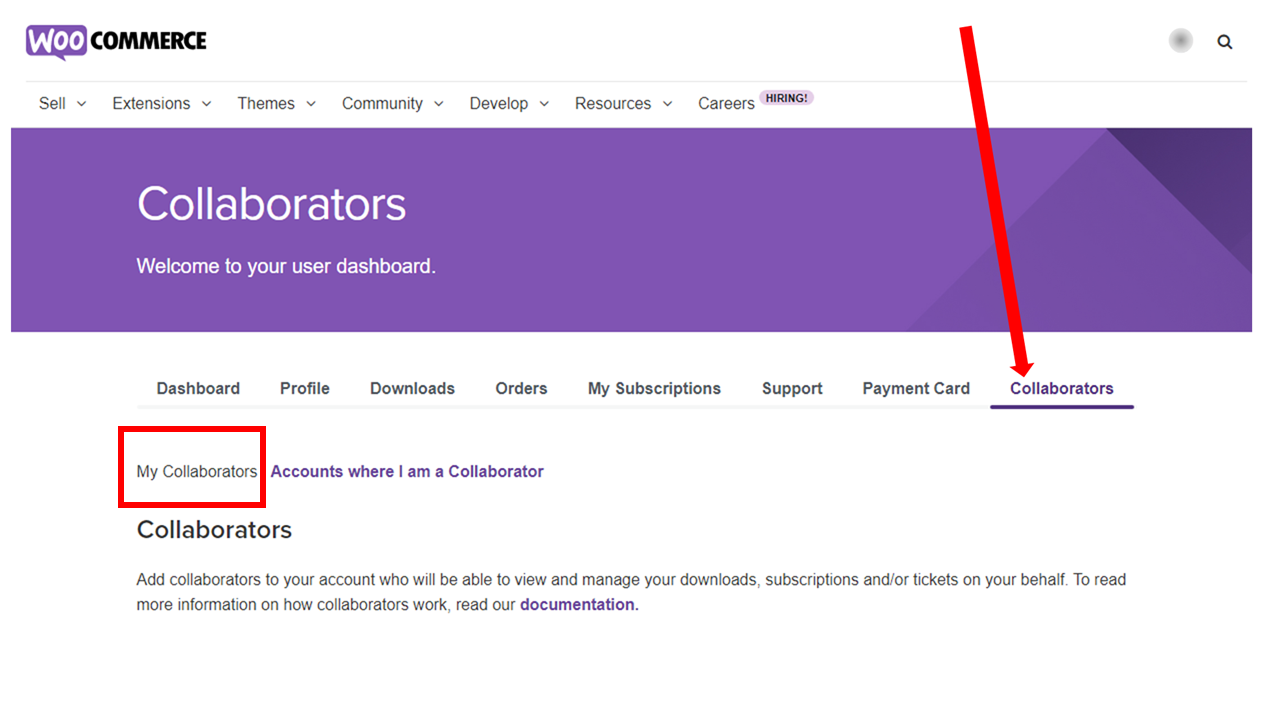
2. Go to the Collaborators tab
Under this tab, you will see two types of views namely My Collaborators and Accounts where I am a Collaborator. Make sure that you are looking at My Collaborators.
3. Type in the email address of the person you want to add
It’s important to make sure that the email address of the person or agency you’re adding as a collaborator is tied to a WooCommerce account. Otherwise, you will get an error message telling you to create a user account for that email address first.

4. Select the permissions you want to allow for the collaborator and click on Add
Ticking the checkbox beside downloads, orders, subscriptions, or tickets will allow them to view and manage these items from your account. The collaborator’s access will depend on the permissions you choose for them.
What Can WooCommerce Collaborators Do?
If you’re worried about how much information collaborators can access in your WooCommerce account, don’t worry. Remember that you can choose to grant permissions to specific items. Depending on their permissions, collaborators can view and manage:
- Your downloads
- The extensions you have subscribed to
- Support tickets
- Store orders
What WooCommerce Collaborators Can’t Do
WooCommerce collaborators cannot do any of the following even when you tick all the permission checkboxes above in Step 4:
- Purchase anything using your account
- Access any of your private information such as your store payment method details
- Set auto-renewal for any products
- Cancel product renewals
- Access order details containing sensitive information about customers
Managing Collaborators
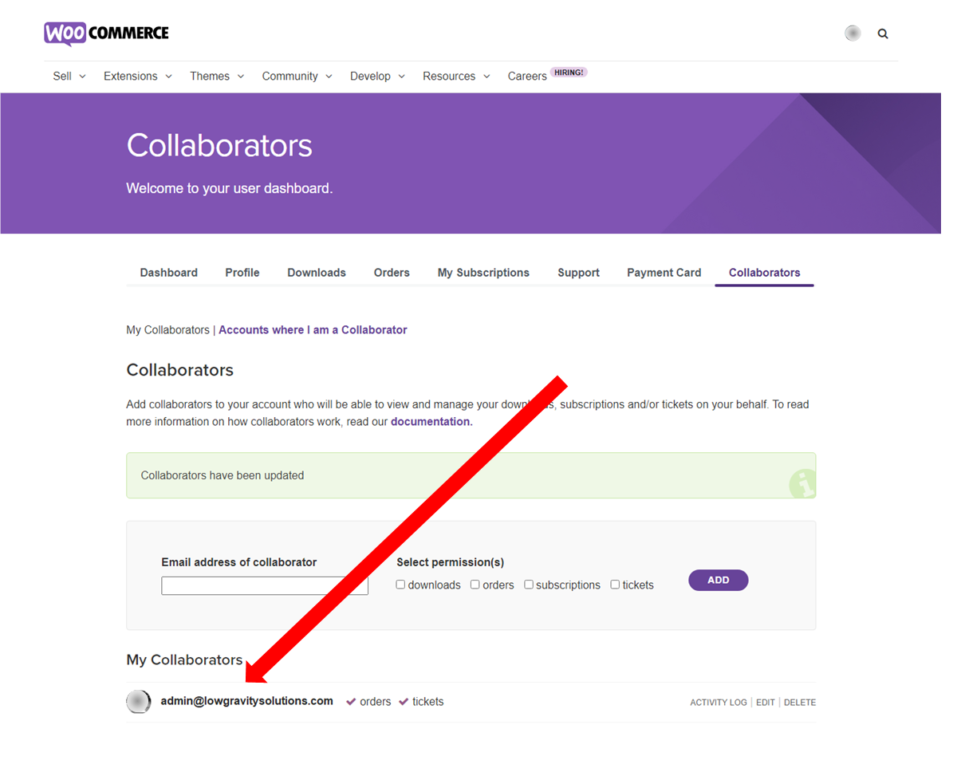
Once you add the collaborator, you can see them under My Collaborators (Step 2 above). From there, you can review the permissions you granted for that person and manage them. You can edit these whenever their roles change by clicking on Edit.
There is also an option to Delete the collaborator so they won’t have access to your account. Deleting users who are no longer connected to your business protects you from unauthorized access and all the headaches that could stem from it. You can also see everything they have done under your account when you click on Activity Log.
LGS specializes in marketing automations and process automations for 7- and 8-figure e-commerce brands, often helping them scale and adding an extra “0” to their bottom line. Contact LGS now if you’d like help with your project and schedule a free 30-minute meeting.
by David Sandel | Last updated Feb 13, 2022 | Published on Feb 13, 2022 | Web Development, WordPress
Any time I need to access a client’s WordPress website, it’s always better to add me as an Admin user instead of giving me your login credentials. For one, most people tend to reuse passwords. So if you give out your WordPress password, you’re likely giving out the password to several other of your accounts. For two, if you have two-factor authentication, we’ll skip past the need to share verification codes with each other.
This is a simple 5-step process to add a WordPress Admin User that will only take you 3-minutes after you’ve done it once.
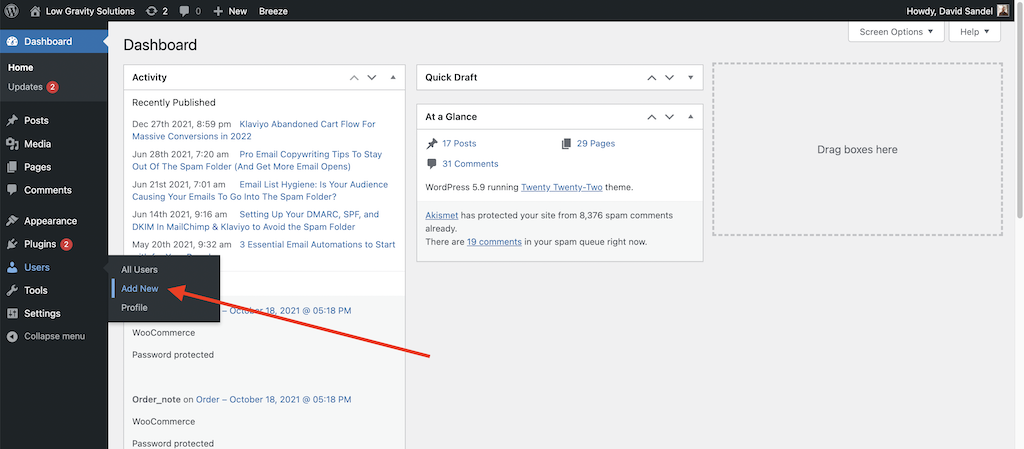
1. Login to the WordPress Dashboard

2. Hover over “Users” and click on ‘Add New’
“Users” is located on the left-hand navigation panel. Depending on the number of plugins you have installed, you may or may not have to scroll down the page a little.
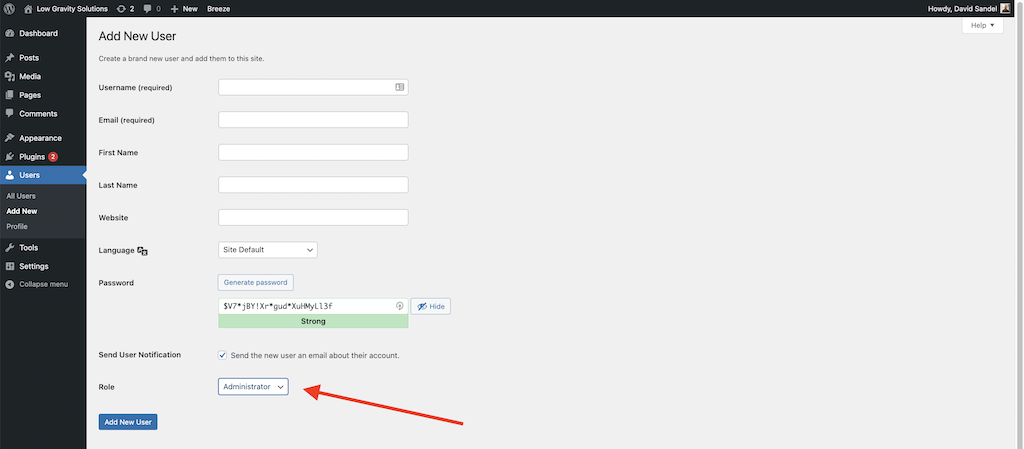
3. Fill in the required fields
- Username: Make it easy. Use their first name or full name.
- Email: Use their actual email. The newly created WordPress login information will be sent there.
- Leave the pre-filled password that is already generated by WordPress
- Leave the checkbox marked to email the user
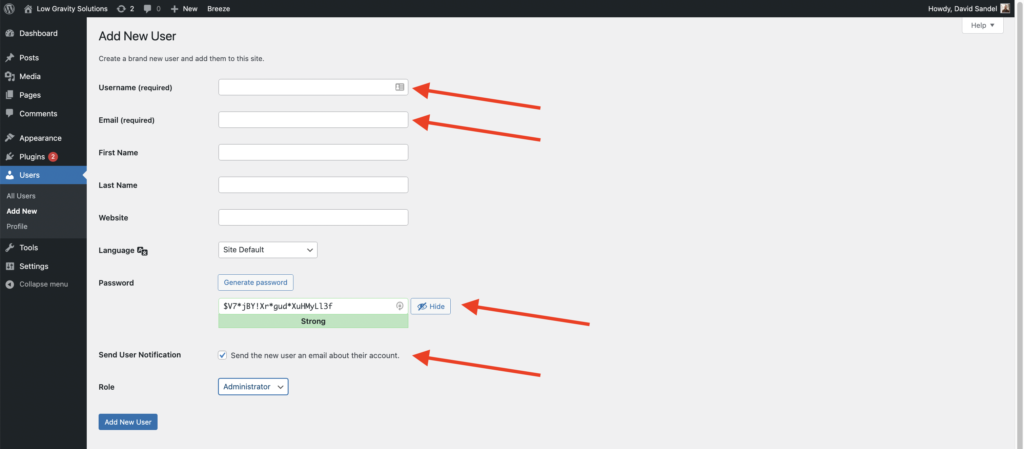
4. Select “Administrator” as the role.
You can already see this in the previous image above, but since this is the most important of adding a WordPress Admin User, it deserves an arrow all by itself.
5. Click the “Add New User” button
If you’ve filled everything out correctly, the new user will receive an email with the WordPress login credentials you provided.
by David Sandel | Last updated Feb 3, 2021 | Published on Jul 4, 2018 | Email Marketing, Mailchimp, Web Development
What is MailChimp Domain Authentication and Why Do I Care?
 MailChimp Domain Authentication is a trackable piece of embedded code in your MailChimp email header that most humans never see. It tells the internet provider of your MailChimp List subscriber’s internet service provider that you’re a legitimate sender, and not a Nigerian Prince trying to scam you out of millions of dollars. Basically, it helps your MailChimp email campaign or automation arrive in your subscribers’ inboxes and NOT their SPAM folders. Let’s look at this way… You create a MailChimp newsletter and send it to all your subscribers. It gets delivered to the outer gates of your contact’s email provider, and they ask for some ID. MailChimp says, “No problem, here’s my authentication.” The contact’s email provider then says, “Cool, the inbox is right this way.” — Without proper identification, the newsletter may or may not end up in the inbox. It could go to SPAM. And if you’re selling something or in the middle of an automation funnel, you definitely want that email going to their inbox.
What MailChimp Domain Authentication Looks Like to Your Contacts
Another cool thing that happens when you authenticate your domain is the way it looks in your contacts’ inboxes. Instead of showing something like:
David Sandel [email protected] via blahblah.mailchimp.com
It will just show
David Sandel <[email protected]>
like any other normal email you receive from your friends and family.
MailChimp Instructions for Domain Authentication
MailChimp does an excellent job of explaining how to authenticate your domain, and it’s incredibly easy. Just follow these simple steps to find them:
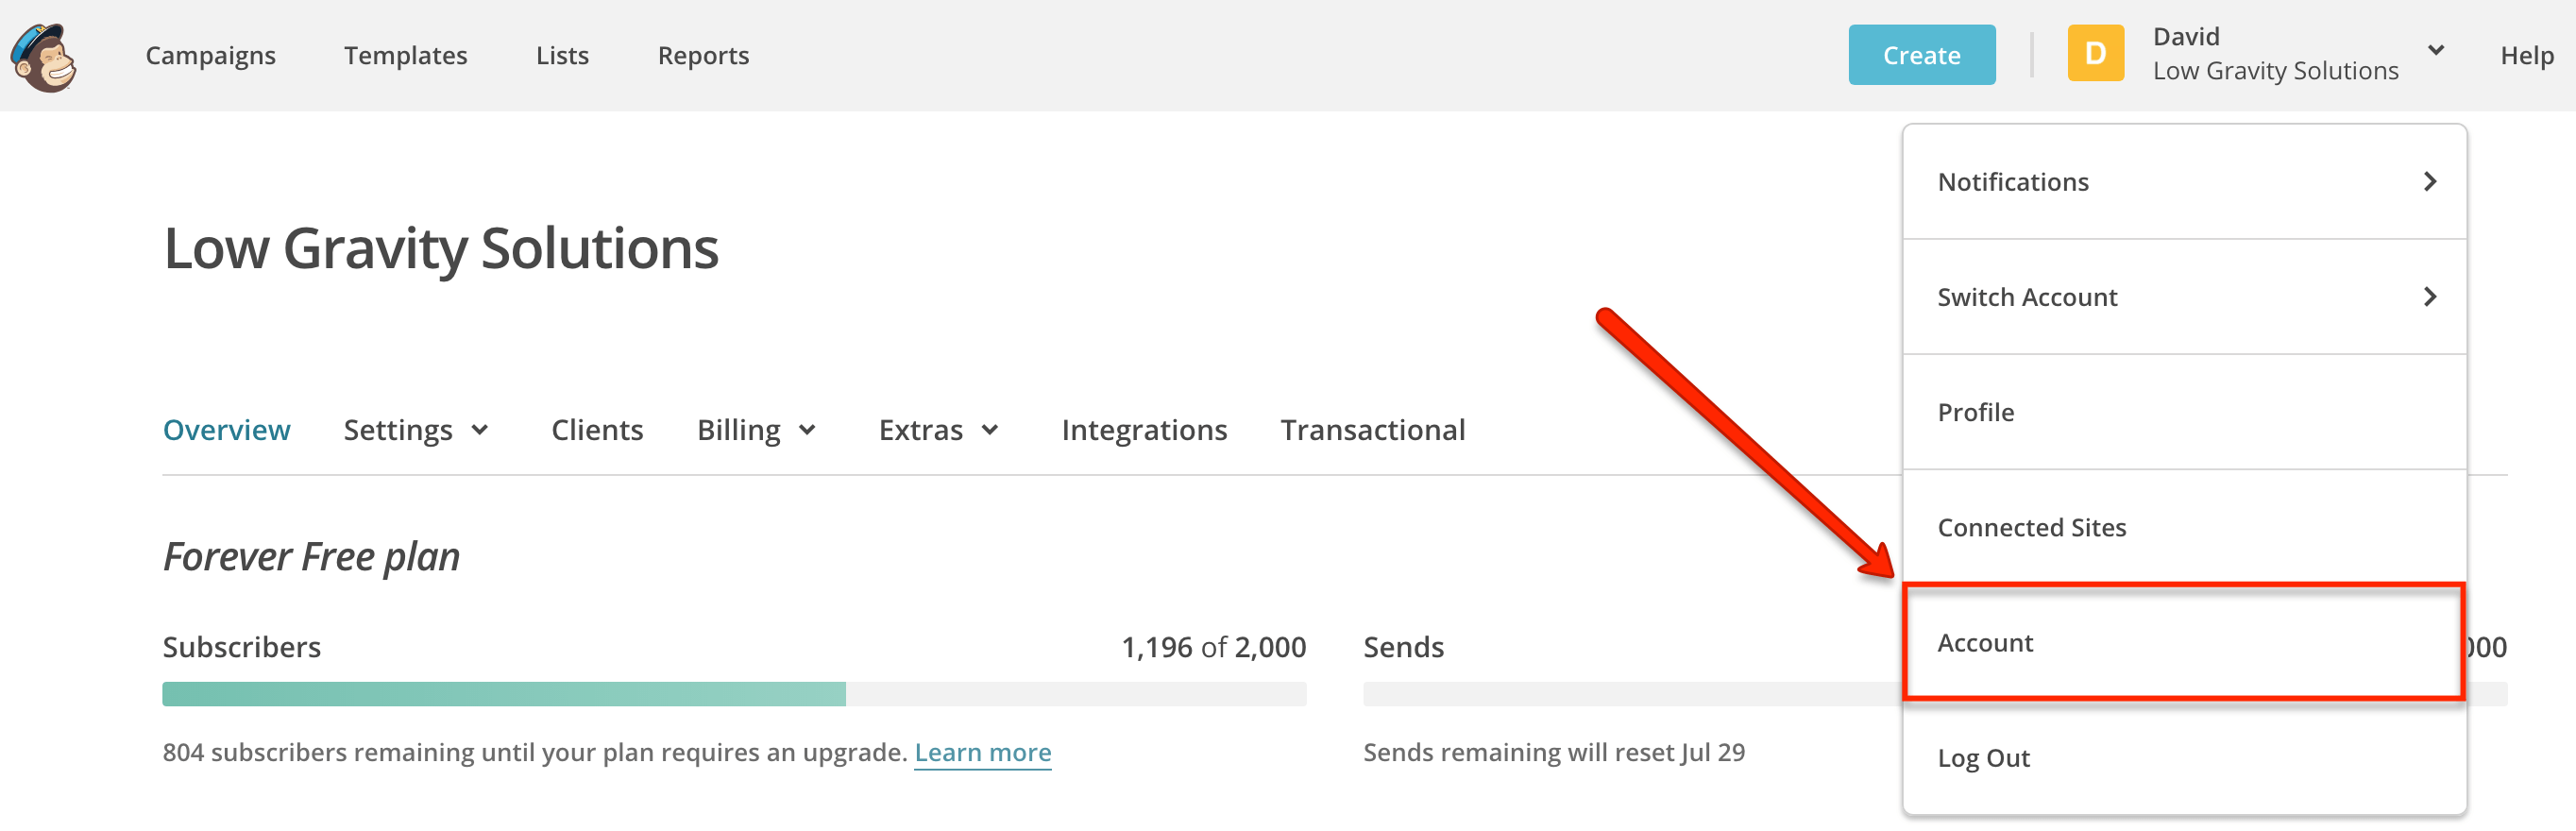
1. Sign-in to your MailChimp account, and then choose “Account” from the drop-down menu next to your name in the upper-righthand corner of the screen.
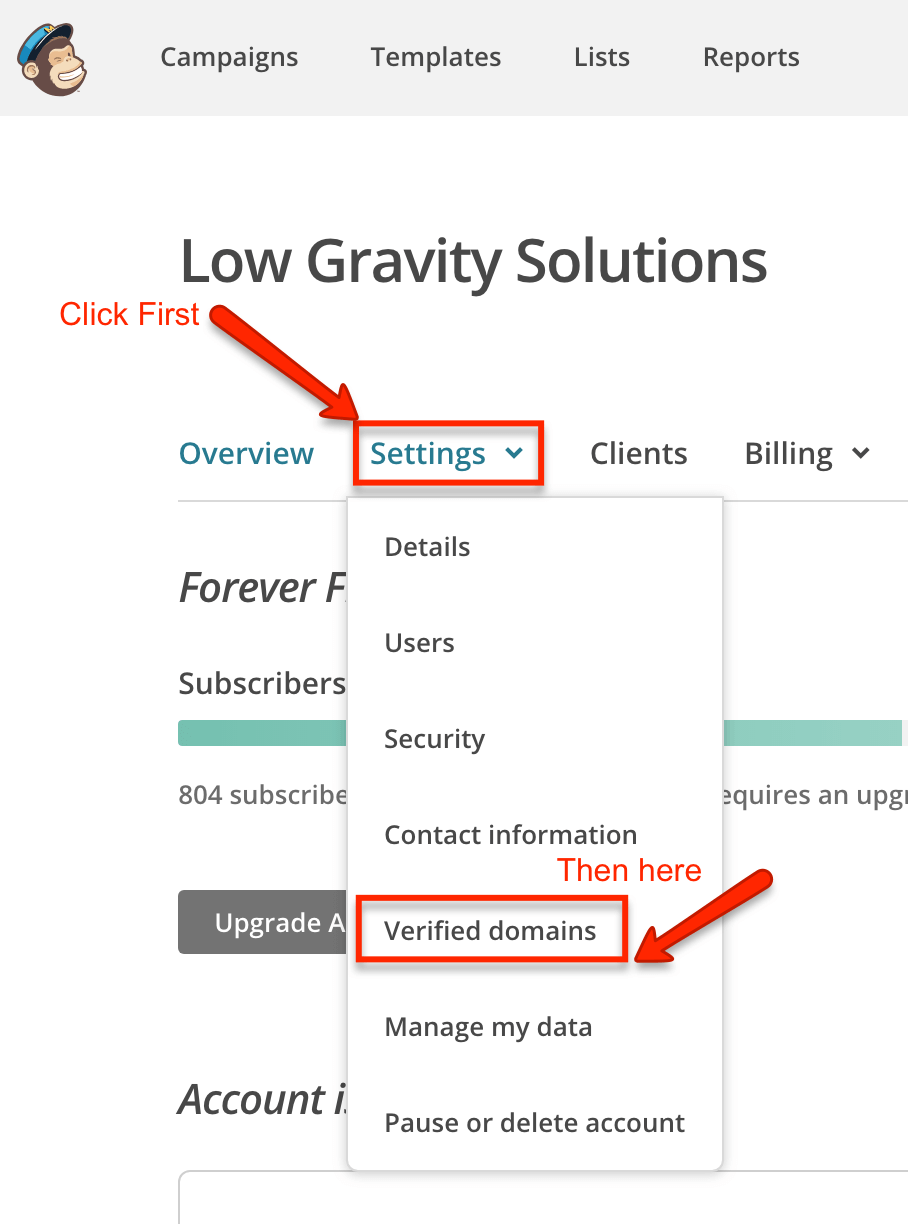
2. Click on the “Settings” tab and choose “Verified Domains.”
3. Click on “View Setup Instructions” for the domain you would like to authenticate.
4. You should now be able to see the instructions.
MailChimp Verified Domains
MailChimp Authentication Instructions
MailChimp Domain Authentication
MailChimp Authentication with Bluehost Web Hosting
The reason I wrote this post is that there are a few tricks that I had to learn the hard way when dealing with Bluehost. Nevertheless, the steps are pretty simple and straightforward.
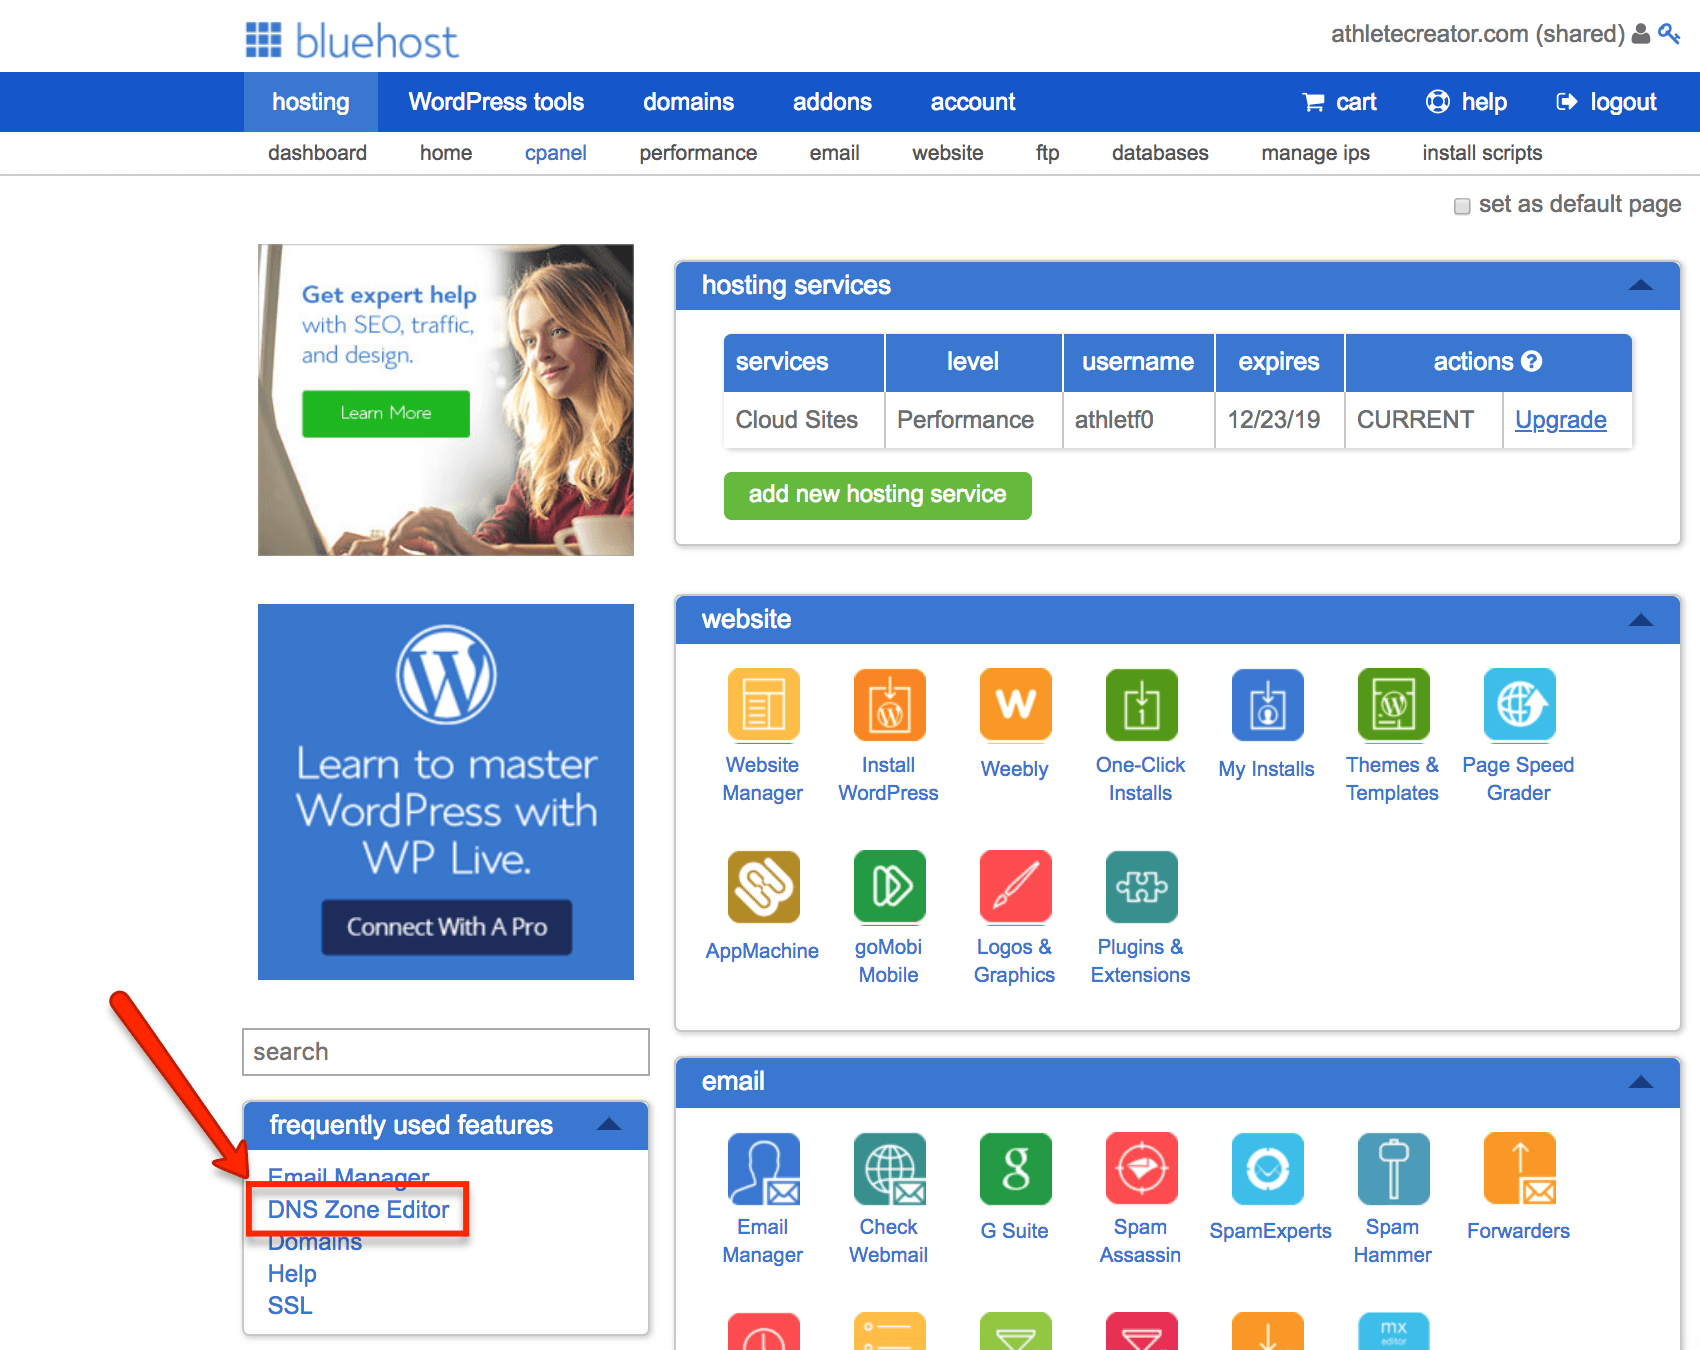
1. Login to your Bluehost cpanel. Down the page on the left or in the “domains” section in the middle of the page, will be a link for your DNS Zone Editor. Click it.
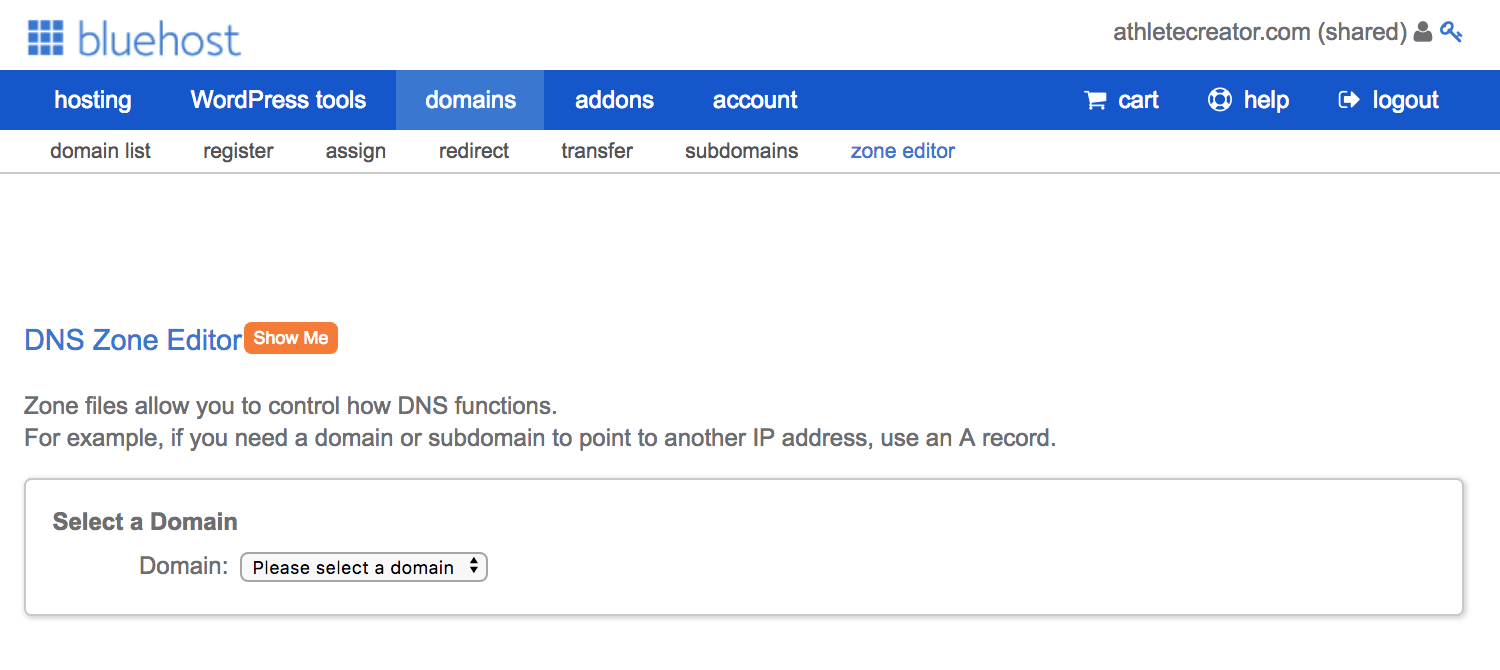
2. On the next screen, click the dropdown box and select the domain you want to authenticate with MailChimp.
3. Create the TXT record per the MailChimp instructions; however, DO NOT use ‘yourdomain.com’ as the Host Record like MailChimp says. You must use the @ symbol as the Host Record like I show in the picture below.
4. Create the CNAME record per the MailChimp instructions. You’ll notice that after you click “add record,” yourdomain.com might disappear from the host record field and end up looking like k1._domainkey. That’s fine and MailChimp will be able to authenticate you anyway.
Verifying the MailChimp Authentication Worked
Bluehost claims that changes in the DNS records should take effect within 4 hours of the updates, and MailChimp says to allow 24-48 hours. In reality, I’ve had this process work as fast as immediately and as slow as 48 hours.
The chance that you go back to MailChimp immediately and everything works is low, but not impossible. So if it doesn’t work right away, just try to be patient and check back whenever you have time.
The steps are basically the same as above in the MailChimp section. Navigate to the “Verified Domains” screen, click on “View Setup Instructions,” but this time, you’ll click on “Authenticate Domain” when the instructions pop up.
Goodbye SPAM Folder; Hello Inbox
At this point your domain should be authenticated and in good standing with any SPAM databases. However, it doesn’t automatically mean that if your emails were already being delivered to someone’s SPAM folder that they will now be going to their inbox. If that’s happening, you’re not likely to know about it, and you just have to hope they check someday and add you to their safe sender’s list.
This is also not the only thing you should be doing to avoid your campaigns ending up in someone’s SPAM. Believe it or not, the words you use, subject lines, pictures, how you use links, and how often other people have marked you as SPAM or reported abuse also affects it. It’s a running score of how trustworthy you are, so make sure you’re following all the email marketing best practices.
If you suspect your MailChimp campaign emails are already going to everyone’s SPAM and don’t know how to fix it, let’s get in touch and see if we can get you out of email prison. I’m an official MailChimp Expert, and I’d love to help you out.
Low Gravity Solutions
Low Gravity Solutions is a full service marketing agency specializing in growing your small business and solving your entrepreneurial problems. You don’t have time to do everything, so let us do it for you.
[contact-form-7 id=”692″ title=”Blog Post – MC and BH”]
**Disclaimer: This page contains affiliate links. If you buy something after clicking one, I will receive a very small percentage of the purchase price, but it costs exactly the same to you.

by David Sandel | Last updated Mar 28, 2020 | Published on Jan 11, 2018 | Web Development, WordPress
It’s now 2020, and the original article written in 2018 still holds up! We are in the peak times of Coronavirus, and I did add a few bits of new information. If you’ve been putting off your website for decades already, NOW is the perfect time.
It’s 2018. Why does your business not have a website yet? Or, it’s 2018, this is the year you start that business and get it off the ground! And for that, you’ll also need a website. You see, your website is the hub of your brand. Yes, some people get Instagram famous or create a brand that lives entirely on one social media platform, but by and large, nearly every business has a website and/or a blog to contain relevant information and additional monetization techniques. If you’re just getting into the digital game, you absolutely must have a website. And I highly highly suggest you start with WordPress. (more…)