Should You Resend Unopened Emails in Mailchimp? (+ How To Do It)

Should You Resend Unopened Emails in Mailchimp? (+ How To Do It)

With over 3.064 billion emails sent per day in 2020, it’s easy for yours to be left unopened. But the big question for your email marketing strategy is – should you really resend it?

Retargeting unopened emails means only resending the email to recipients who didn’t open the original one. After all, maybe some of your audience were busy, and didn’t see it the first time?

But the truth is, there’s a time and a place for retargeting unopened emails, and it’s not always for the better. 

Is resending worth it? 

The short answer is no. 

Even though MailChimp statistics showed open rates for the original campaign increased by 8.7% when it was re-sent, It’s not worth it for content like newsletters.

The hard truth is that sometimes people aren’t interested in that particular content, and if you keep resending it, you’re going to drive them to unsubscribe and decrease your customer base. 

The impact from retargeting isn’t worth the effort or potential risk for things that aren’t going to directly convert or benefit your business. Plus, open rates need to be analyzed as part of a wider marketing strategy, not just taken in isolation. 

But, there’s a caveat to this. 

There are certain scenarios where retargeting unopened emails can be beneficial. 

When should you resend?

Not everything is black and white. For extremely important announcements and notifications where you absolutely need as many contacts as possible to see your email, it can be helpful. For example: 

  • Business changes like during COVID-19 when closures or updates for your physical store were happening much quicker than you could update your website.
  • New services or local initiatives/events.
  • Big news that would affect the customer e.g. you’ve rebranded, created a partnership etc. 

But this is pretty much it. For these occasions, here’s how you do it: 

Resending unopened emails in MailChimp

Replicate campaign for MailChimp resendingOn Desktop 

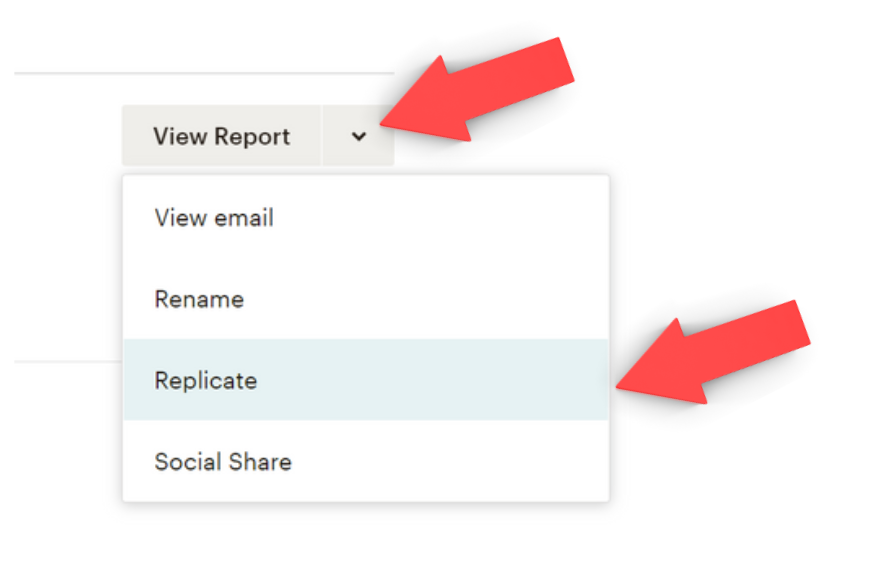
Go to ‘Campaigns’ > Select the campaign you want to resend > Hit the arrow next to ‘View Report’ and Select ‘Replicate’.

This will then create a complete copy, so you’ll need to edit who it is being sent to. 

Pro Tip: I suggest always changing the name of the campaign, so it’s easy to identify at a glance, but it’s completely up to you and your organization.

To do this:

Go to the ‘To’ field and under ‘Segment or Tag’ select ‘Group or new segment’ in the dropdown.

Then select ‘campaign activity’ in the first box, ‘did not open’ in the second, and then the third box will give you a list of campaigns, as well as options like ‘did not open the last 5 campaigns’.

resegmenting in MailChimp

Once you’ve updated this, the email will only go to the subscribers who meet this criteria, instead of the entire list.

Pro Tip: If you’re unsure if you’ve set the campaign correctly, save this and take a look at the number of recipients that have been updated in the ‘to’ field. If it has gone down you know you’ve updated the criteria.

Resend emails mailchimp mobile app

On Mobile

It’s a lot easier to do this in the MailChimp mobile app as you just need to go to: 

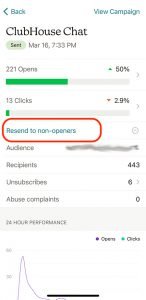
The email campaign of choice in the ‘Reports’ tab > Select ‘send to non-openers.’

2 of the best resending strategies

Resending your campaign to non-openers is not as simple as hitting resend and expecting better results. Here are two ways to make your approach more effective: 

Timing is everything

It’s important to get the timing right to make sure you don’t annoy your subscribers. Sending too soon is going to make you seem spammy, sending too long might no longer be relevant for them. 

Here are the ‘best bits’ from MailChimps’ research on Strategic Timing for Resends: 

  • 1-3 days is the sweet spot – Resending your email within 24 hours of the original results in higher unsubscribes or abuse complaints, but waiting for 1 to 3 days results in more clicks. In our experience, it’s better to wait at least 2 days, but beyond 3 days, you’re much less likely to get a higher click rate anymore. 
  • Choose your day wisely – According to one study, Tuesday is the best time to send emails, followed by Wednesday and Thursday, which debunks the traditional ‘send at 9am on Monday approach’.
  • Afternoon for opening, evening for action – The same study shows that the afternoon is the time when recipients are most likely to open emails and evening is when they’re most likely to respond.

Make subtle changes

If they saw (and chose) to not open your email the first time, it’s unlikely they’re going to open it the second time around without some subtle changes. The easiest and quickest option is to change your subject line and preview text (which sounds a lot easier than it is!).

My advice is to scrap what’s there and start fresh. Think about exactly what you want them to know in 10 words or less and avoid clickbait! Bonus points if you can tastefully use an emoji (assuming your audience is okay with emojis).

Pro Tip: Avoid changing who the email is from when you resend. This is a tactic that can damage trust, delivery, and sees an increase in abuse reports according to MailChimp.  

Ultimately, MailChimp retargeting is a strategy that should be used sparingly and only when absolutely necessary. But if you do, you have a short window, and you have to make it count if you want to see the best results!

For help with your email marketing efforts so you can focus on your business, drop me a message. I lead Low Gravity Solutions as a MailChimp Expert and Klaviyo Master with over 8 years of experience and countless happy clients. 

Learn more here: https://lowgravitysolutions.com/email-marketing/

Ready to get started?

David Sandel, Founder

David Sandel, Founder

Low Gravity Solutions

LGS provides full-service automated digital marketing for seven-figure businesses, including strategy, technology management, copy, and design. Your passion is your business. Ours is marketing and automation.

MailChimp Siteground Domain Authentication

MailChimp Siteground Domain Authentication

What is MailChimp Domain Authentication and Why Do I Care?

MailChimp LogoMailChimp Domain Authentication is a trackable piece of embedded code in your MailChimp email header that most humans never see. It tells the internet provider of your MailChimp List subscriber’s internet service provider that you’re a legitimate sender, and not a Nigerian Prince trying to scam you out of millions of dollars. Basically, it helps your MailChimp email campaign or automation arrive in your subscribers’ inboxes and NOT their SPAM folders.

Let’s look at this way… You create a MailChimp newsletter and send it to all your subscribers. It gets delivered to the outer gates of your contact’s email provider, and they ask for some ID. MailChimp says, “No problem, here’s my authentication.” The contact’s email provider then says, “Cool, the inbox is right this way.” — Without proper identification, the newsletter may or may not end up in the inbox. It could go to SPAM. And if you’re selling something or in the middle of an automation funnel, you definitely want that email going to their inbox.

What MailChimp Domain Authentication Looks Like to Your Contacts

Another cool thing that happens when you authenticate your domain is the way it looks in your contacts’ inboxes. Instead of showing something like:

David Sandel [email protected] via blahblah.mailchimp.com

It will just show

David Sandel <[email protected]>

like any other normal email you receive from your friends and family.

MailChimp Instructions for Domain Authentication

MailChimp does an excellent job of explaining how to authenticate your domain, and it’s incredibly easy. Just follow these simple steps to find them:

1. Sign-in to your MailChimp account, and then choose “Account” from the drop-down menu next to your name in the upper-righthand corner of the screen.

2. Click on the “Settings” tab and choose “Verified Domains.”

3. Click on “View Setup Instructions” for the domain you would like to authenticate.

4. You should now be able to see the instructions.

MailChimp Authentication with Siteground Web Hosting

The reason I wrote this post is that I already had instructions available for Bluehost users, but I wanted to make sure I didn’t leave out Siteground, another massively popular hosting service. The steps are pretty simple and straightforward for every provider, but each provider may also require that you enter them differently.

1. Login to your Siteground cpanel. Loof for the “Domains” section in the middle of the page, and click the link for the Advanced DNS Zone Editor.

2. On the next screen, click the dropdown box and select the domain you want to authenticate with MailChimp. (If you only have one domain, this may already be selected for you.)

3. Create the TXT record per the MailChimp instructions. Enter ‘yourdomain.com’ as the Host Record just like MailChimp says.

4. Create the CNAME record exactly per the MailChimp instructions. 

Verifying the MailChimp Authentication Worked

Siteground and Mailchimp claim that changes in the DNS records may take 24-48 hours to propagate through the internet. In reality, I’ve had this process work as fast as immediately and as slow as 48 hours. The chance that you go back to MailChimp immediately and everything works is low, but not impossible. So if it doesn’t work right away, just try to be patient and check back whenever you have time.

The steps to verify your authentication are basically the same as above in the MailChimp section. Navigate to the “Verified Domains” screen, click on “View Setup Instructions,” but this time, you’ll click on “Authenticate Domain” when the instructions pop up.

Goodbye SPAM Folder; Hello Inbox

At this point your domain should be authenticated and in good standing with any SPAM databases (provided you didn’t kill your score prior to this already). However, it doesn’t automatically mean that if your emails were already being delivered to someone’s SPAM folder, that they will now be going to their inbox. If that’s happening, you’re not likely to know about it, and you just have to hope they check someday and add you to their safe sender’s list.

This is also not the only thing you should be doing to avoid your campaigns ending up in someone’s SPAM. Believe it or not, the words you use, subject lines, pictures, how you use links, and how often other people have marked you as SPAM or reported abuse also affects it. It’s kind of like a running score of how trustworthy you are, so make sure you’re following all the email marketing best practices. If you suspect your MailChimp campaign emails are already going to everyone’s SPAM and don’t know how to fix it, let’s get in touch and see if we can get you out of email prison. I’m an official MailChimp Expert, and I’d love to help you out.

David Sandel

David Sandel

Low Gravity Solutions

Low Gravity Solutions is a full service marketing agency specializing in growing your small business and solving your entrepreneurial problems. You don’t have time to do everything, so let us do it for you.

[contact-form-7 id=”2981″ title=”MC and SG blog post”]

**Disclaimer: This page contains affiliate links. If you buy something after clicking one, I will receive a very small percentage of the purchase price, but it costs exactly the same to you.
MailChimp Domain Authentication with Bluehost Web Hosting

MailChimp Domain Authentication with Bluehost Web Hosting

What is MailChimp Domain Authentication and Why Do I Care?

MailChimp LogoMailChimp Domain Authentication is a trackable piece of embedded code in your MailChimp email header that most humans never see. It tells the internet provider of your MailChimp List subscriber’s internet service provider that you’re a legitimate sender, and not a Nigerian Prince trying to scam you out of millions of dollars. Basically, it helps your MailChimp email campaign or automation arrive in your subscribers’ inboxes and NOT their SPAM folders. Let’s look at this way… You create a MailChimp newsletter and send it to all your subscribers. It gets delivered to the outer gates of your contact’s email provider, and they ask for some ID. MailChimp says, “No problem, here’s my authentication.” The contact’s email provider then says, “Cool, the inbox is right this way.” — Without proper identification, the newsletter may or may not end up in the inbox. It could go to SPAM. And if you’re selling something or in the middle of an automation funnel, you definitely want that email going to their inbox.

What MailChimp Domain Authentication Looks Like to Your Contacts

Another cool thing that happens when you authenticate your domain is the way it looks in your contacts’ inboxes. Instead of showing something like:

David Sandel [email protected] via blahblah.mailchimp.com

It will just show

David Sandel <[email protected]>

like any other normal email you receive from your friends and family.

MailChimp Instructions for Domain Authentication

MailChimp does an excellent job of explaining how to authenticate your domain, and it’s incredibly easy. Just follow these simple steps to find them:

1. Sign-in to your MailChimp account, and then choose “Account” from the drop-down menu next to your name in the upper-righthand corner of the screen.

2. Click on the “Settings” tab and choose “Verified Domains.”

3. Click on “View Setup Instructions” for the domain you would like to authenticate.

4. You should now be able to see the instructions.

MailChimp Authentication with Bluehost Web Hosting

The reason I wrote this post is that there are a few tricks that I had to learn the hard way when dealing with Bluehost. Nevertheless, the steps are pretty simple and straightforward.

1. Login to your Bluehost cpanel. Down the page on the left or in the “domains” section in the middle of the page, will be a link for your DNS Zone Editor. Click it.

2. On the next screen, click the dropdown box and select the domain you want to authenticate with MailChimp.

3. Create the TXT record per the MailChimp instructions; however, DO NOT use ‘yourdomain.com’ as the Host Record like MailChimp says. You must use the @ symbol as the Host Record like I show in the picture below.

4. Create the CNAME record per the MailChimp instructions. You’ll notice that after you click “add record,” yourdomain.com might disappear from the host record field and end up looking like k1._domainkey. That’s fine and MailChimp will be able to authenticate you anyway.

Verifying the MailChimp Authentication Worked

Bluehost claims that changes in the DNS records should take effect within 4 hours of the updates, and MailChimp says to allow 24-48 hours. In reality, I’ve had this process work as fast as immediately and as slow as 48 hours.

The chance that you go back to MailChimp immediately and everything works is low, but not impossible. So if it doesn’t work right away, just try to be patient and check back whenever you have time.

The steps are basically the same as above in the MailChimp section. Navigate to the “Verified Domains” screen, click on “View Setup Instructions,” but this time, you’ll click on “Authenticate Domain” when the instructions pop up.

Goodbye SPAM Folder; Hello Inbox

At this point your domain should be authenticated and in good standing with any SPAM databases. However, it doesn’t automatically mean that if your emails were already being delivered to someone’s SPAM folder that they will now be going to their inbox. If that’s happening, you’re not likely to know about it, and you just have to hope they check someday and add you to their safe sender’s list.

This is also not the only thing you should be doing to avoid your campaigns ending up in someone’s SPAM. Believe it or not, the words you use, subject lines, pictures, how you use links, and how often other people have marked you as SPAM or reported abuse also affects it. It’s a running score of how trustworthy you are, so make sure you’re following all the email marketing best practices.

If you suspect your MailChimp campaign emails are already going to everyone’s SPAM and don’t know how to fix it, let’s get in touch and see if we can get you out of email prison. I’m an official MailChimp Expert, and I’d love to help you out.

David Sandel

David Sandel

Low Gravity Solutions

Low Gravity Solutions is a full service marketing agency specializing in growing your small business and solving your entrepreneurial problems. You don’t have time to do everything, so let us do it for you.
[contact-form-7 id=”692″ title=”Blog Post – MC and BH”]
**Disclaimer: This page contains affiliate links. If you buy something after clicking one, I will receive a very small percentage of the purchase price, but it costs exactly the same to you.